Friday, March 30, 2012
Tote bag
Another tote bag I created as a gift for a coworker. I found this adorable fabric on clearance for $2.00/yd at Hobby Lobby so I stocked up and got a few yards. It will work for so many different projects. I made a traditional tote and made a simple tie embellished with a flower button for around one of the handles. I also added some solid brown to the bottom of the handles to break up the busy print on the outside of the tote. The finished tote measures approximately 13 1/2" by 14". Perfect for many uses.
Ribbon and eyelet craft bag
I created this small tote bag using an eyelet punch, scrap fabric, and some ribbon I had on hand. The finished bag measures just under 12" by 12". It is perfect for a travel bag for craft supplies...such as knitting or crocheting supplies. A quick and simple project that could be filled with crafting supplies for a cute and thoughtful gift.
Thursday, March 29, 2012
A hint of pink quilt
I made this quilt for my niece for Christmas using a simple fence rail quilt block. I adjusted the size of the strips to make the finished quilt approximately 40" by 45"....the perfect size for cuddling up on the couch with. I personalized it by simply adding a 5 1/2" wide solid strip of fabric and appliqueing her name onto that. I also added a puffy heart after her name simply by applying some batting under the heart I cutout and securing it using a zig zag stitch. I finished it by stitching in the ditch in various places along the quilt.
Hooded toddler towel
The basics for making this hooded toddler towel can be found at patches.typepad.com. There are alot of hooded towel tutorials online but I chose this one because they showed you how to make a rounded hood and finish off the seams using either a serger or a zig zag stitch. The finished project is very clean and secure. Having the basics for making the hooded towel you are free to embellish as you choose. I appliqued my son's name on the back of the towel and put a strip of Buzz Lightyear fabric across the hood. Since the hooded towel only took half of one hand towel to make the hood I used the other half of the hand towel to make some washcloths. The first is a simple washcloth with a saturn applique and binding. The other is double thickness with and handle that will be great to use for hanging in the tub to dry. When I make one for my other little guy I think I will make a bath mitt putting a simple binding and loop on the edge.
Wednesday, March 21, 2012
Dino flashcards
I made these dinosaur themed flashcards from some felt and scrap fabric that I had. These are simple and fun to create. Choose any theme...my three year old loves flashcards and wants a set of his own with numbers and letters. Colors would be great for a younger child as well. I used heat and bond lite to carefully adhere the appliques I cut out and stitched around the outside for security. I used an eyelet punch from my scrapbooking tools to make the ring in the corner. Lastly I made a tie just like you make a tote bag handle. I tied that into a knot to secure all the flashcards together...and you have some cute dinosaur flashcards!
Thursday, March 15, 2012
Stacked coin quilted tote
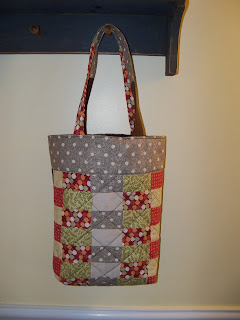
I had wanted to use these fabric scraps that I had hanging around in my scrap bucket for quite some time but couldn't decide what project to use them for. I finally decided to make a tote with the scraps. Most of the scrap pieces used were from fat quarters that were used for another project. I simply cut some 2 x 3 rectangles and pieced them together in the pattern I wanted. Then I added a strip along the top to complete the front panel. After quilting the front with a bold brown thread (I wanted the quilting to stand out) I attached a solid back panel for the back of the tote. I continued the scrappy theme by using different fabrics to create the handles for the tote. After adding some gussets and a lining the tote was finished. The finished tote measures around 14 by 12 inches.
Scrappy linen tote
There is a great tutorial for this tote that can be found at ilikeorangetoo.blogspot.com. After making this tote completely with scraps that I had in my scrap bucket I would make a suggestion. While I did save some money, I was disappointed with the flat colors of the tote. I loved the look of the tote on the tutorial and wish I would have used linen and bright bold colors for the varying strips. If I made another I would make sure I used a solid color with bright bold fabrics for the strips to achieve the same look as the one that goes along with the tutorial. Lesson learned...sometimes it pays to make an extra trip to the fabric store! Be sure to look at this tutorial at ilikeorangetoo.blogspot.com.
Thursday, March 8, 2012
Sophisticated floral tote
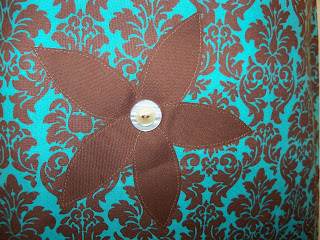
I have been trying to think of some original designs for some tote bags I am making. I added some blocks of solid brown to the straps in random intervals to break up the bold pattern. I also added a flower applique. I cut some petals out of fabric and used heat and bond lite to adhere them to the front of the bag. After stitching close to the edge of the petals I added a large blue button and a smaller green button in the center of the applique. Make it original and make it your own by adding any design and embellishments you like.
Mug rug: scrappy colorblock
This mug rug is perfect for any hot or cold drink and some treats. I found the tutorial at www.sew-fantastic.blogspot.com. I love the bright rainbow colors and the modern quilted look. I think it is a cute pattern to use to make some potholders or coasters to match. I am going to pair this with a coffee cozy as a gift for one of my friends who is a coffee lover.
Simply sweet bag
I was searching and searching one night for a tote bag tutorial that I wanted to make using this fabric. I came up short and couldn't find anything that I thought would work with this fabric. I decided to make one all my own. I made it simple because I thought the fabric could have the tendency to overwhelm the whole bag with the bold print. I simply created three strips for the front panel, a solid back, lining with an interior pocket and added a small heart applique. If you were using a print that wasn't so busy I thought it would look great to stitch free hand across the solid strip or add a decorative stitch there. I decided to add a simple heart applique. A tutorial on this bag will appear shortly on my blog for those interested.
Tote bag
Created using the tote bag tutorial at sonnetofthemoon.blogspot.com, this was fun and easy to make. The basic construction involves making a 12 inch quilt block and adding a small strip of fabric at the top of the block to create the front panel of the tote. The back panel can be a another quilt block or a cut of another fabric. I have been searching for another quilt block that I love to make another bag out of. Using this tutorial and your favorite quilt block you can create a one of a kind tote bag for any friend or family member.
Simple tote bag
Made for a friend, this tote bag is perfect for everyday use. I fell in love with this fabric at Joann's while I was looking for some sales. This fabric is from the quilter's showcase line and happened to be on sale for $2.50 a yard. The total cost of this bag came in around $1.05. So for that price I picked up more prints of the quilter's showcase fabric and plan to customize each bag to make everyone I give away a little different. For this bag I personalized it with the first letter of her name and added some offeset pink blocks to the straps for a bit of color. The basic tutorial can be found at www.skiptomylou.org. I hope you use the tutorial and then make it your own!
Tuesday, March 6, 2012
Disappearing 9 patch tote bag
I am always looking for new and interesting tote bag patterns to try. Trust me, I have a folder on the computer full of totebag tutorials just waiting to be made! They are great to make and store for gifts for friends and family. I'm pretty sure any girl or woman would love to have a new bag. This pattern comes from sewhappygeek. I found this pack of charm squares at Joann fabrics and knew it would be perfect for one of my coworkers. I can't wait to give it away for her to enjoy!
Hushabye tote bag
Here's another great tutorial on modabakeshop.com. The front pockets are made using jelly roll strips...quilt them how you like and create as many pockets as you like to customize the bag for any need. I did a traditional quilt pattern on the front and stitched in the ditch on the back pocket. I created two pockets on the front and left the pocket on the back large. After piecing an interior pocket together I thought there were enough pockets for this bag! This would be a great all purpose bag or a smaller diaper bag.
Friday, March 2, 2012
Tic Tac Toe quilt
My oldest son loves board games, flashcards, puzzles, etc. So when I came upon this tutorial from sewandsoquilts.blogspot.com I knew it would be the perfect quilt for him. A quilt he can play tic tac toe on for hours and then curl up with when he's worn out. This tutorial was featured on www.modabakeshop.com. I decided to quilt it so that the tic tac toe board would be echoed on the back of the quilt...this way, if he gets tired of one side he can play on the other as well. In her tutorial she made bean bags for the game pieces. Since we have a baby in the house I decided to make square coasters instead and iron on an "x" and an "o". I made 10 coasters in all. This would be quite a unique gift that any child would be sure to love!
Thursday, March 1, 2012
Personalized quilt
Subscribe to:
Comments (Atom)


